Prop making is probably one the most time consuming, but rewarding processes that go into a cosplay. Prop making in my opinion can also be one of the most challenging when you do not already have artistic and/or technological skills. But that’s where creativity comes into play!
This tutorial is going to teach you the basics of how to make a wizard staff. The staff I made is a bit more advanced because I made it for my Dragon Age: Inquisition cosplay for Dragon*con.
How to Make a Wizard Staff: Materials Used
-
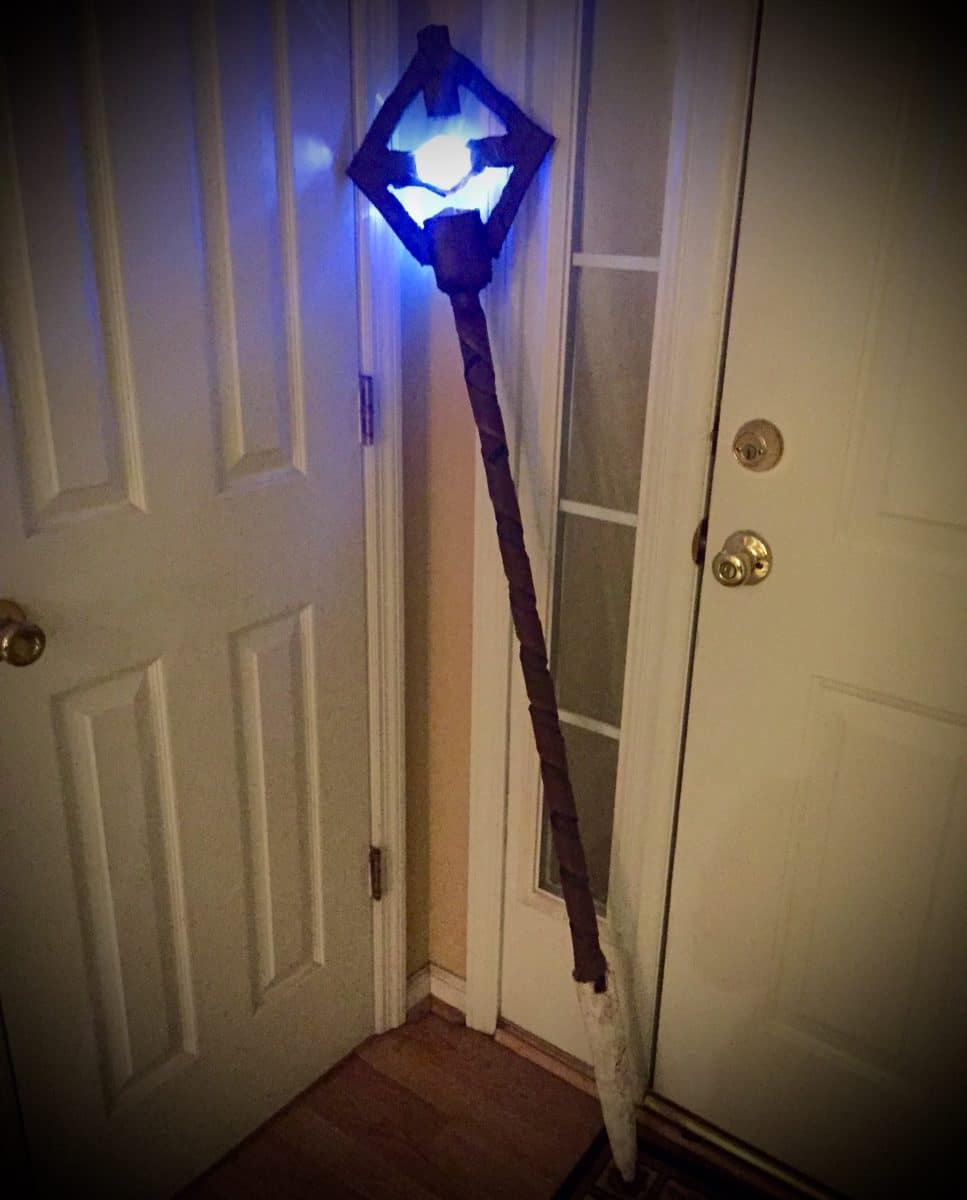
![IMG_1470]()
Finished wizard staff. Click to embiggen. Shovel Handle from ACE Hardware. (I only used this because I thought I was actually going to carve into the wood. You can use a PVC pipe, or any other cheaper alternative.)
- “Great Stuff Gap Filler” (expandable foam)
- Craft Foam (You can find it in sheets at Joann’s and any other craft store)
- Acrylic paint
- Hot glue gun
- Sand paper
- Utility knife
- Paper mache mix (Flour, water and Elmer’s glue)
- Plastids from ACE Hardware (or any hardware store)
- Mod Podge from Joann’s, Hobby Lobby, or any craft store.
Advanced and more expensive route:
- Worbla (for advanced cosplayers because it’s heavy duty and expensive. You can find it on cosplaysupplies.com)
- EVA foam sheets (can find on Amazon or possibly in a local hardware store)
- heat gun (can find on amazon too).
How to Make a Wizard Staff: Let’s Get Started
First, prep your work space, covering surface area in your work space so it will not be ruined. Get the base of your staff (shovel handle) and the gap filler. What I did for mine was I sprayed the gap filler on both ends of the handle because I knew I had a design for the top and then a staff “blade” for the bottom.
However, if you only want to make a cool design or shape for the head of your staff, just spray the expanding foam at the top. Do not be alarmed when the first time you spray the foam it comes out fast and expands into a massive clump. Also don’t worry about trying to spray your shape because it is not going to work. Just spray the amount you think you’ll need. Let the foam set. Once dry, flip it over and spray the other side.
Once the expanding foam sets, you’re going to want to start forming your top shape. Use a box cutter/utility knife to cut away the foam you know for sure is just excess. Once you got it cut down close to what your shape will be, get the sand paper and start smoothing and sanding it down to the more defined shaped.
Time to get more messy.
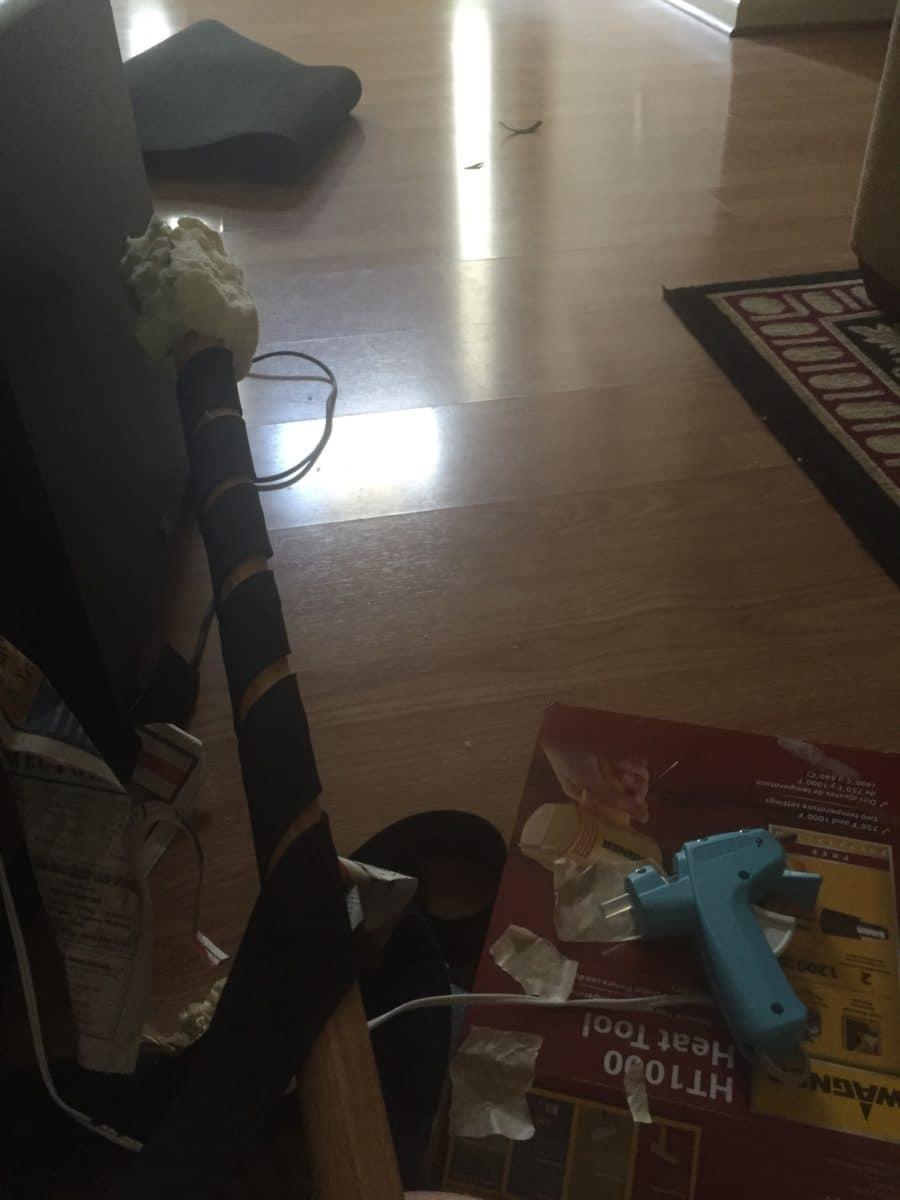
Once your staff head is ready, now you get to make a paper mache mix. I make my paper mache mix with just flour, water, and some Elmer’s glue. The consistency for mine is usually pretty thin and it still makes the figure sturdy and gives you a smooth surface to paint on. Use newspaper or old magazine clippings and soak them in your paper mache mix.
Layer and wrap the strips around your figure. Let it dry and harden. After your paper mache is done you can now paint it however you like!
Now for the grip.
For my staff, I tried to make a faux leather weaving pattern down my staff grip. You can do whatever design or add whatever accessories you like to your staff, but if you want to learn my technique this is what I did.
Use the craft foam sheets or rolls and cut them into somewhat long strips. Try to line up and wrap your foam around the staff to see what kind of technique you want to use. Once you know how you’re going to wrap the foam strips around, get your hot glue gun and gradually glue the strips to the staff little by little. What I did was I took one of the long strips and wrapped it around like a candy cane pattern and glued it. Then I got the other strip and did the same, but just wrapped it in the other direction.
Once you have the craft foam glued down, the paint job is the crucial part. You can prime your foam by using Mod Podge and then Plastidip. It will save you from painting 7 billion layers of paint to the foam. Then paint it the color “leather” you would like. I went with a typical dark brown.
Optional: Worbla Users
If you decided to use Worbla for this, skip the expanding foam. What you’ll need to do is use the EVA foam sheets. Make templates from paper or poster board of what you want your shape to be. Once you got your desired template, cut it out of your EVA foam. For me I ended up doubling up my foam sheets to make it thicker. Use your same template to draw the pattern on the Worbla. Make sure the drawn pattern on the Worbla is just a little bit bigger so it can wrap and mold around the edges of your foam form. Cut it out and then you can place it on a sheet of aluminum foil.
Worbla has a rough side and shiny side. Put your worbla cut out shiny side up on the aluminum because your shiny side acts as an adhesive. Use your heat gun to heat up the Worbla. Never keep the heat gun in one spot and don’t put it too close to the Worbla. Burnt Worbla is a no-no.
Once the warbler is warm enough and tacky enough, place it on the area you want it to be and mold it on the figure to your liking. Be careful because the material gets very hot. Continue that process. If you mess up, you can reuse the piece of worbla by reheating it.
Before you start painting Worbla, you need to prime it. A lot of people rave over using Plastidip to prime, but I disliked the texture on the worbla. I used Elmer’s Wood Glue, and it gave way better results. Once the glue is set and dry, you can start painting the figure however you please.
Want to add cool effects?
As you can tell on my staff, I have this awesome glowing orb at the top of the staff. I wrote a tutorial on how to make the glowing orb that you can check out and add to your wizard staff.
But you can also add feathers, fringe, maybe fake leafy vines, or some tiny shrunken skull heads if you’re going for that Shaman look. The best part of cosplay is the growth of your creativity. There are no limits to your ideas!
I hope you guys have fun creating an awesome wizard staff that boosts your spell power by 100%!
Thanks for reading. If you’ve enjoyed Nerds on Earth, please share with someone else by using the social media buttons just below.